
Display Custom Attribute on PDP – Complete Guide
In the world of e-commerce, product data is never static. One of the most common customization tasks in SAP Commerce Cloud is extending the out-of-the-box Product model with new attributes. But adding the attribute to the database is only step one. True integration means pushing that data all the way to your customer-facing touchpoints: a traditional Accelerator storefront, and a modern headless Spartacus (SAP Commerce Cloud Composable Storefront) application and printing it on a PDF document.
Here is your comprehensive, step-by-step guide to making it happen.
Step by step guide:
Scenario: Suppose we want to add a new product attribute- sustainabilityScore and display that attribute on PDP page.
1. Add new attribute in product model
Locate your custom core extension’s *core-items.xml file and add the attribute inside the Product Itemtype definition. To know more about itemtype, refer itemtype.
<itemtype code="Product" autocreate="false" generate="false">
<attributes>
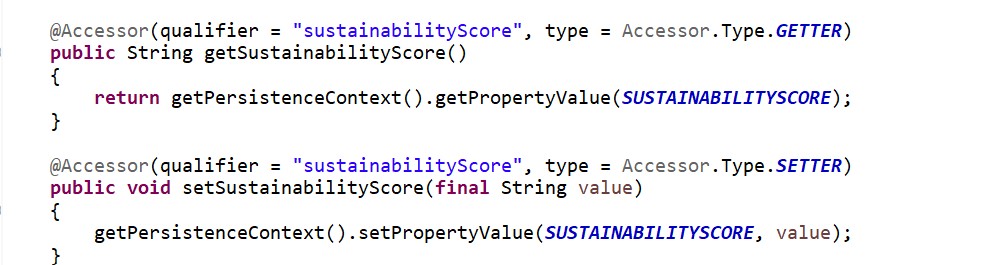
<attribute type="java.lang.String" qualifier="sustainabilityScore">
<modifiers read="true" write="true" search="true"/>
<persistence type="property"></persistence>
</attribute>
</attributes>
</itemtype>2. Build the system
After build, a ProductModel class will automatically include getters and setters for sustainabilityScore
3. Update the database schema
Run System Update in HAC (/hac/platform/update). Then populate test data.
$productCatalog=apparelProductCatalog
$productCatalogName=Apparel Product Catalog

$catalogVersion=catalogversion(catalog(id[default=$productCatalog]),version[default='Staged'])[unique=true,default=$productCatalog:Staged]

# Insert Products
INSERT_UPDATE Product;code[unique=true];$catalogVersion;sustainabilityScore
;M33477_B;;90
4. Show attribute in backoffice(Optional)
By default, newly created attribute is visible in Administration tab in backoffice. If you want to show attribute in any other tab, then do backoffice customization.
<context type="Product" component="editor-area">
    <editorArea:editorArea xmlns:editorArea="http://www.hybris.com/cockpitng/component/editorArea">
        <editorArea:tab name="hmc.tab.product.general">
            <editorArea:section name="Custom Attributes">
                <editorArea:attribute qualifier="sustainabilityScore"/>
            </editorArea:section>
        </editorArea:tab>
    </editorArea:editorArea>
</context>
5. Add attribute inn DTO
Add the new field to the ProductData DTO in your custom facades extension’s *facades-beans.xml.
<bean class="de.hybris.platform.commercefacades.product.data.ProductData">
	<property name="sustainabilityScore" type="String" />
</bean>
6. Create a Custom populator
Create a populator to copy the value from ProductModel to ProductData
public class SustainabilityScorePopulator implements Populator<ProductModel, ProductData>
{
	@Override
	public void populate(final ProductModel source, final ProductData target) throws ConversionException
	{
		if (StringUtils.isNotEmpty(source.getSustainabilityScore()))
		{
			target.setSustainabilityScore(source.getSustainabilityScore());
		}
	}
}
7. Register the Populator in Spring
Wire your populator into the existing product converter bean chain in your *facades-spring.xml.
<bean id="sustainabilityScorePopulator" class="org.training.facades.populators.SustainabilityScorePopulator"/>
<bean parent="modifyPopulatorList">
	<property name="list" ref="productConverter"/>
	<property name="add" ref="sustainabilityScorePopulator"/>
</bean>
8. Displaying on the storefront
Depending on your architecture, you will follow either the Accelerator (Monolithic) path or the Spartacus (Headless) path.
Option A: The Accelerator Approach (JSP / JSTL)
If you are using a legacy Accelerator storefront, your controller passes the ProductData straight to the JSP view layer.
Locate the appropriate JSP fragment (e.g., productDetailsPanel.jsp). Access the property directly using the Spring/JSTL expression language.
<c:if test="${not empty product.sustainabilityScore}">
	<div class="product-sustainability">
		<h1>Sustainability Score:</h1>
		<p >${product.sustainabilityScore} / 100</p>
	</div>
</c:if>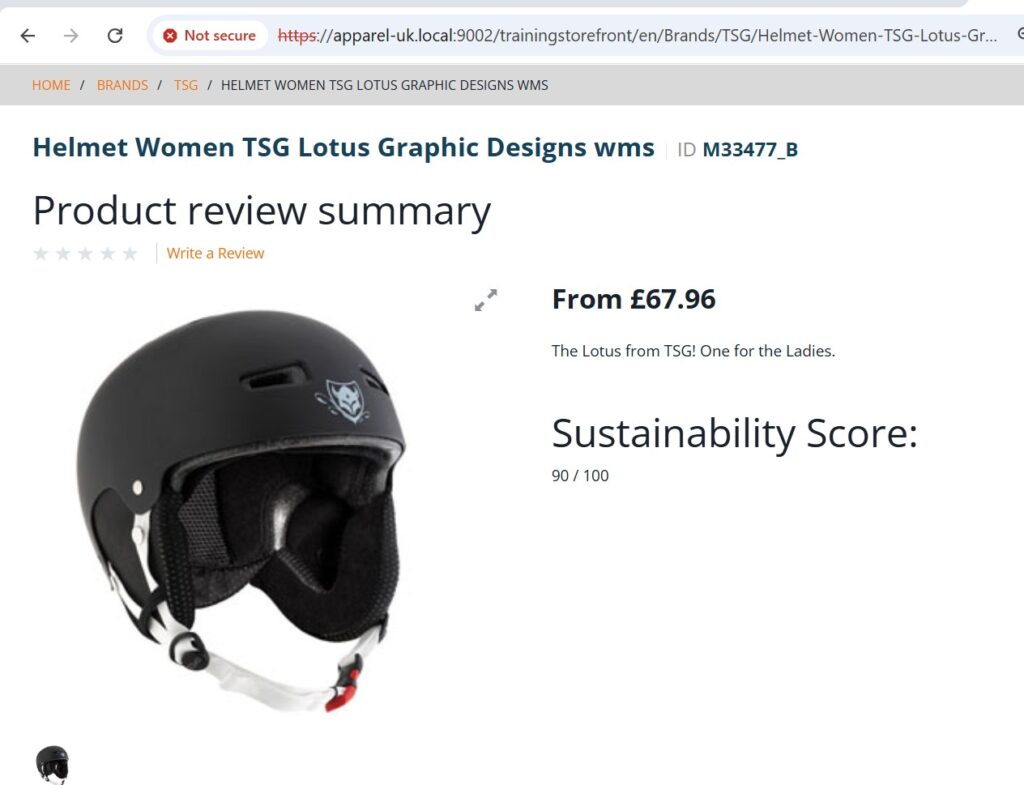
Option B: The Headless Approach (OCC API + Spartacus)
In a Headless Commerce setup, the storefront (Spartacus) is completely separated from the SAP Commerce backend. Data is exchanged through OCC APIs.
Once the new product attribute has been added to the Product model and exposed through the OCC API, the next step is to make it available in the Spartacus storefront.
- Extend the Product Model Interface: Create a custom TypeScript interface in Angular that extends the base Spartacus
Productmodel to include your type-safe sustainabilityScore property. - Create a New Angular Component: Generate a new custom UI component (e.g., ProductEcoComponent) specifically designed to display this attribute.
- Inject the Product Data Stream: Use Spartacus’s built-in CurrentProductService inside your component to safely observe and stream the active product’s data payload directly from the active route store.
- Bind the Field to the Template: Bind the incoming sustainabilityScore property directly into your custom HTML layout template.
- Map Component to a CMS Slot: Configure Spartacus via its layout configuration module(ConfigModule.withConfig) to bind your new Angular component to a specific CMS flex component or slot ID (e.g., ProductDetailsPageSlot). This map tells Spartacus exactly where to render your custom attribute on the live storefront interface based on your Backoffice CMS layout.
The main difference between Accelerator and Spartacus is that Spartacus adds an extra WsDTO/OCC layer and moves the rendering concern entirely to Angular. By following the patterns in this guide, your new attribute will flow cleanly through every layer.