
SAP Commerce OCC API: Complete Beginner’s Guide
If you’re working in SAP Commerce (Hybris), you’ve probably come across the term OCC API quite often. For beginners, it can feel confusing because it involves multiple layers like controllers, facades, DTOs, and converters. But once you understand the flow, it becomes one of the most powerful and essential concepts in Hybris development.
What is SAP Commerce OCC API?
OCC stands for Omni Commerce Connect. It is a set of REST APIs in SAP Commerce that allows external applications to interact with the Hybris backend. These APIs provide access to important features like product details, cart operations, user login, and order management.
In simple terms, OCC acts as a bridge between the frontend and the backend. Instead of using traditional JSP or Accelerator pages, modern applications communicate through APIs. This makes the system more flexible and allows easy integration with mobile apps, single-page applications (SPAs), and other external systems.
Why do we need OCC API
- Frontend flexibility: Frontend developers can use modern tools like React or Angular, instead of being limited to Accelerator/JSP
- Omnichannel support: You can use the same logic for your website, iOS app, Android app, and even an in-store kiosk.
- Decoupled Architecture: Frontend and backend operate independently, which simplifies both development and deployment processes.
- Better scalability: You can update your website look frequently without ever touching the stable backend code.
- Ready-to-use APIs: Predefined APIs are provided for handling products, carts, users, checkout, and orders.
- Easy integration: Enables easy interaction with external systems like ERP solutions, payment services, and third-party applications.
Key Components of OCC API:
- Endpoint URLs:
Endpoint URLs are the actual API paths used to access OCC services. They follow a structured format like: /occ/v2/{baseSiteId}/{resource} - Controller:
The controller serves as the first point of contact for incoming HTTP requests. It is responsible for exposing API endpoints and routing each request to the correct method. Controllers should remain lightweight and not include any business logic. Their key role is to handle the request, pass it to the facade for processing, and return. the response. - Facade layer:
The facade layer acts as a bridge between controllers and services.It holds the business logic and prepares data in a format suitable for the presentation layer. Rather than exposing services directly, facades offer a simplified and API-friendly interface. - Service layer:
The service layer handles the core business logic, including retrieving data, applying business rules. - Data access layer:
This layer interacts with the SAP Commerce Cloud database to handle CRUD operations on data models. It forms the core data foundation, where structures are defined in items.xml and data is persisted and retrieved using SQL.
To know how we represent data in each layer. refer data representation.
Versioning in OCC:
In SAP Commerce OCC APIs are available in two versions – v1 and v2. While both are still supported, they follow very different approaches.
OCC v2 (Default – Stateless):
Version 2 is the default and works on a stateless REST approach. This means each request is handled independently, and the server does not remember any previous user data. So, every time you make a request, you must send all required information like customer ID or cart ID.
These APIs are well-structured, follow standard REST principles, and allow you to create or update data using request parameters or the request body. Because of this design, Version 2 is more suitable for modern, scalable, and headless applications.
OCC v1 (Legacy – Stateful):
Version 1 works in a stateful way, which means the server keeps track of user data like cart and session using sessions (JSESSIONID). Its flow is similar to the traditional accelerator-based storefront, especially for things like checkout.
Because the server remembers the user’s context, the client doesn’t need to send all details in every request. The APIs can return responses in both XML and JSON formats.
Authentication in OCC:
In SAP Commerce, OCC uses OAuth 2.0 as the standard protocol for authorization. It’s the gatekeeper that decides whether a mobile app, a JS storefront (like Spartacus/Composable Storefront), or a third-party system can access specific data.
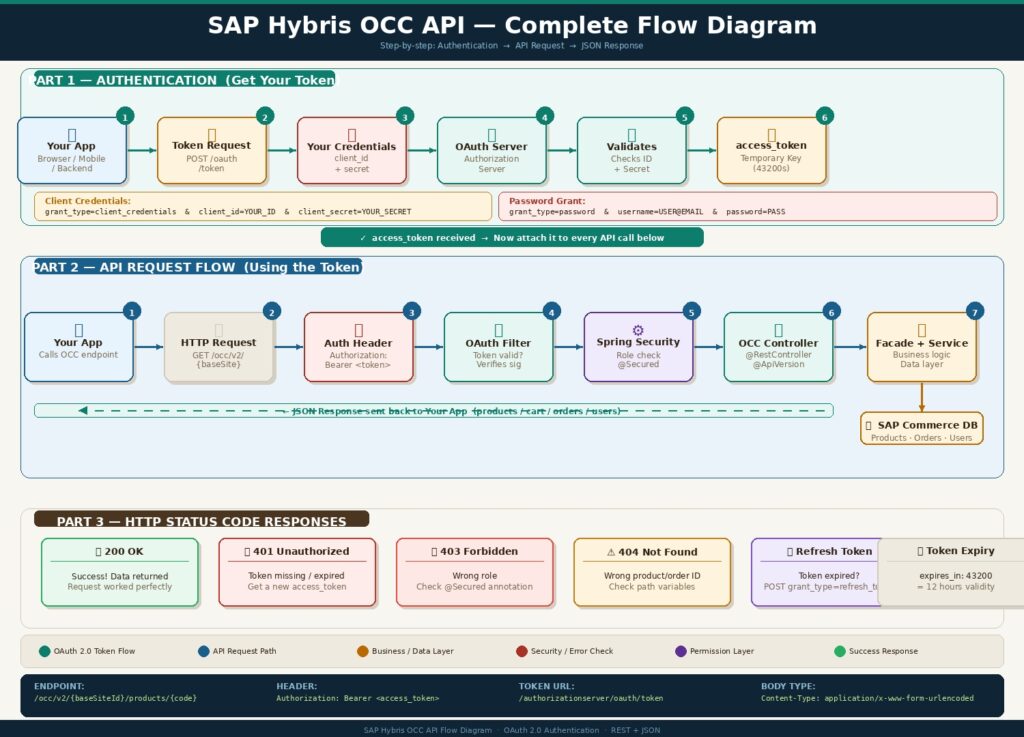
How the authentication flow works:
- When a client (such as a mobile app, SPA, or Postman) wants to access OCC APIs, it first needs to obtain an access token. This is done by calling the OAuth token endpoint:
/authorizationserver/oauth/token - The client sends required credentials such as:
- client_id and client_secret (to identify the application)
- username & password (in case of user-based login)
- If the credentials are valid, SAP Commerce returns a response containing access token.
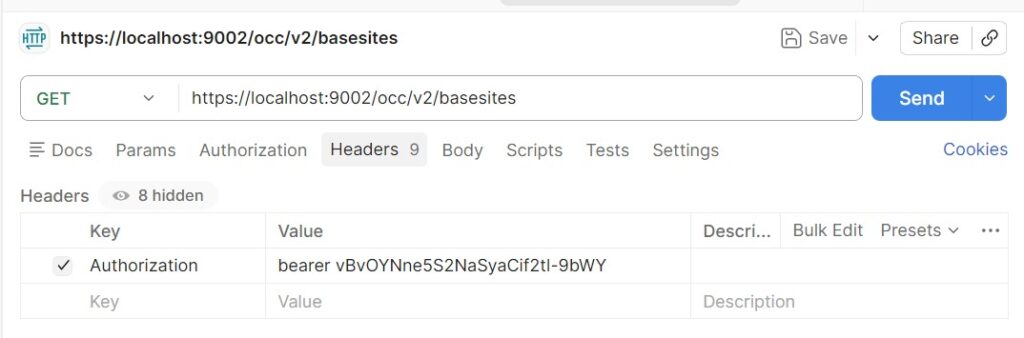
- Once the token is received, it must be included in every OCC API request in the HTTP header:
Authorization: Bearer <access_token> - The OCC layer validates this token for each request. If valid, the request is processed; otherwise, a 401 Unauthorized error is returned.
Here’s a step-by-step implementation of Authentication & Authorization in OCC API in a practical, project-style flow:
- Create OAuth Client via backoffice or impex.
INSERT_UPDATE OAuthClientDetails;clientId[unique=true]	;resourceIds; scope; authorizedGrantTypes; authorities; clientSecret; registeredRedirectUri
;mobile_android; hybris; basic; authorization_code,refresh_token,password,client_credentials ;ROLE_CLIENT; secret;- Generate Access Token
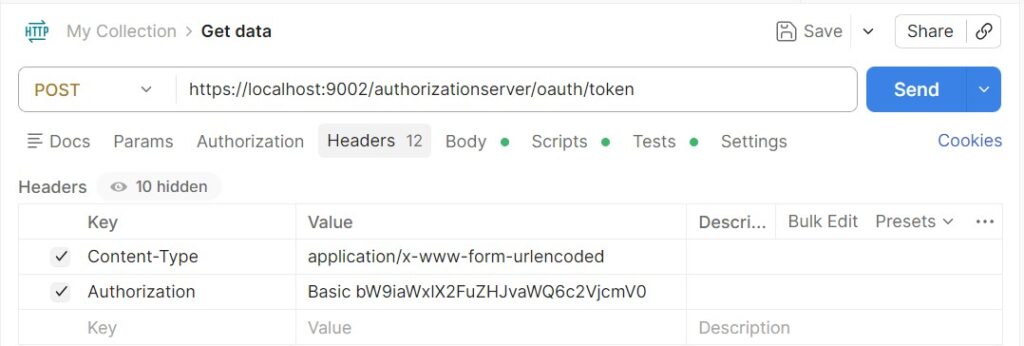
Endpoint URL:
POST https://<your_domain>/authorizationserver/oauth/token
For example, if you are trying in your local: https://localhost:9002/authorizationserver/oauth/token
Header:
Authorization: Basic base64(clientId:clientSecret)
Content-Type: application/x-www-form-urlencoded
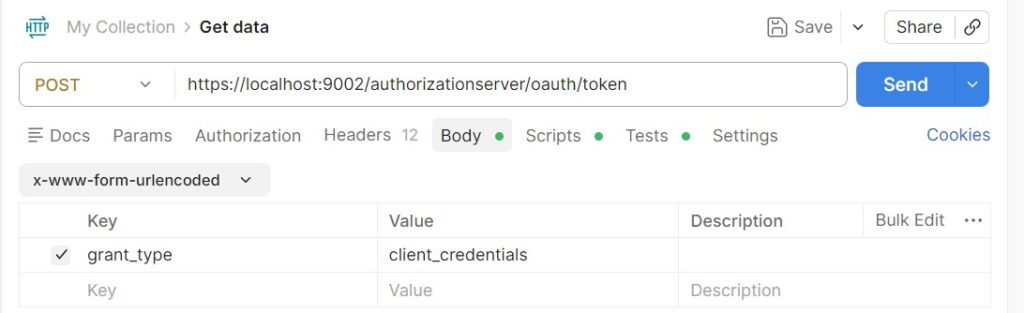
Body:
grant_type: password
Response:

- Call OCC API with generated token
Step by step guide of OCC API with Practical example
We will create a OCC API to expose Laptop data to third party system like Swagger.
- Create a Laptop itemtype in *-items.xml file
<itemtype code="Laptop" generate="true" autocreate="true">
	<deployment table="laptop" typecode="12002"/>
	<attributes>
		<attribute type="java.lang.String" qualifier="electronicId">
			<modifiers read="true" write="true" optional="false" initial="true"/>
			<persistence type="property"/>
			<description>Unique product identifier</description>
		</attribute>
		<attribute type="localized:java.lang.String" qualifier="electronicName">
			<modifiers read="true" write="true" optional="true"/>
			<persistence type="property"/>
			<defaultvalue>"SmartPhone"</defaultvalue>
			<description>Localized product name </description>
		</attribute>
		<attribute type="java.lang.String" qualifier="processorModel">
			<modifiers read="true" write="true" optional="false"/>
			<persistence type="property"/>
			<defaultvalue>"i7"</defaultvalue>
			<description>Intel Core</description>
		</attribute>
		<attribute type="java.lang.Integer" qualifier="ramGB">
			<modifiers read="true" write="true" optional="false"/>
			<persistence type="property"/>
			<defaultvalue>8</defaultvalue>
			<description>RAM in GB</description>
		</attribute>
		<attribute type="java.lang.Integer" qualifier="storageGB">
			<modifiers read="true" write="true" optional="false"/>
			<persistence type="property"/>
			<defaultvalue>128</defaultvalue>
			<description>SSD/HDD storage in GB</description>
		</attribute>
	</attributes>
</itemtype>
Perform build and respectively system update for generating model class ,table etc.
- Create interface LaptopDAO
public interface LaptopDAO
{
	public List<LaptopModel> getAllLaptops();
}- Define DAO implementation class
public class DefaultLaptopDAO implements LaptopDAO
{
	private static final String ALL_LAPTOP = "SELECT {pk} FROM {Laptop}";

	@Autowired
	private FlexibleSearchService flexibleSearchService;
	@Override
	public List<LaptopModel> getAllLaptops()
	{
		final FlexibleSearchQuery query = new FlexibleSearchQuery(ALL_LAPTOP);
		final SearchResult<LaptopModel> searchResult = flexibleSearchService.search(query);
		return searchResult.getResult().isEmpty() ? null : searchResult.getResult();
	}
}- Create interface LaptopService
public interface LaptopService
{
	public List<LaptopModel> getAllLaptops();
}- Define Service implementation class
public class DefaultLaptopService implements LaptopService
{
	@Autowired
	private LaptopDAO laptopDAO;
	@Override
	public List<LaptopModel> getAllLaptops()
	{
		return laptopDAO.getAllLaptops();
	}
}- Configure bean for above DAO and Service class in *-spring.xml file
<bean id="defaultLaptopDAO" class="com.electronic.dao.impl.DefaultLaptopDAO"/>
<bean id="defaultLaptopService" class="com.electronic.service.impl.DefaultLaptopService"/>- Create DTO LaptopData in *facades-beans.xml
<bean class="com.electronic.data.LaptopData">
	<property name="electronicId" type="java.lang.String"></property>
	<property name="electronicName" type="java.lang.String"></property>
	<property name="processorModel" type="java.lang.String"></property>
	<property name="ramGB" type="java.lang.Integer"></property>
	<property name="storageGB" type="java.lang.Integer"></property>
</bean>
Perform build for generation data class.
- Create LaptopPopulator by implementing Populator Interface where taking source as LaptopModel and target as LaptopData. To know more about converter and populator, refer converter-populator.
public class LaptopPopulator implements Populator<LaptopModel, LaptopData>
{
	@Override
	public void populate(final LaptopModel source, final LaptopData target) throws ConversionException
	{
		target.setElectronicId(source.getElectronicId());
		target.setElectronicName(source.getElectronicName());
		target.setProcessorModel(source.getProcessorModel());
		target.setRamGB(source.getRamGB());
		target.setStorageGB(source.getStorageGB());
	}
}- Register populator bean and create converter in *facades-spring.xml
<bean id="laptopPopulator" class="com.electronic.populator.LaptopPopulator"></bean>

<bean id="laptopConverter" parent="defaultProductConverter">
	<property name="populators">
		<list merge="true">
			<ref bean="laptopPopulator"/>
		</list>
	</property>
</bean>- Create LaptopFacade Interface
public interface LaptopFacade
{
	public List<LaptopData> getAllLaptops();
}- Define facade implementation class
public class DefaultLaptopFacade implements LaptopFacade
{
	private Converter<LaptopModel, LaptopData> laptopConverter;
	@Autowired
	private LaptopService laptopService;
	@Override
	public List<LaptopData> getAllLaptops()
	{
		final List<LaptopData> laptopList = new ArrayList<>();
		final List<LaptopModel> laptops = laptopService.getAllLaptops();
		if (CollectionUtils.isNotEmpty(laptops))
		{
			for (final LaptopModel model : laptops)
			{
				final LaptopData data = getLaptopConverter().convert(model);
				laptopList.add(data);
			}
		}
		return laptopList;
	}
}- Register Facade bean in *facades-spring.xml
<bean id="defaultLaptopFacade" class="com.electronic.facade.impl.DefaultLaptopFacade">
	<property name="laptopConverter" ref="laptopConverter"></property>
</bean>- Define LaptopWsDTO in *webservices-beans.xml.
<bean class="com.electronicwebservices.data.LaptopWsDTO">
		<property name="electronicId" type="java.lang.String"/>
		<property name="electronicName" type="java.lang.String"/>
		<property name="processorModel" type="java.lang.String"/>
		<property name="ramGB" type="java.lang.Integer"/>
		<property name="storageGB" type="java.lang.Integer"/>
	</bean>
Do build.
- Create Controller
@Controller
@RequestMapping(value = "/{baseSiteId}/laptops")
@Tag(name = "Laptops")
public class LaptopController extends BaseController
{
    private static final Logger LOGGER = Logger.getLogger(LaptopController.class);
    @Resource(name = "defaultLaptopFacade")
    private LaptopFacade laptopFacade;
    @Secured({"ROLE_TRUSTED_CLIENT"})
    @GetMapping
    @ResponseBody
    @Operation(
        operationId = "getLaptops",
        summary = "Get list of laptops",
        description = "Returns all available laptops"
    )
    public List<LaptopWsDTO> getAllLaptops(
            @RequestParam(defaultValue = DEFAULT_FIELD_SET) final String fields)
    {
        LOGGER.info("Fetching all laptops");
        final List<LaptopWsDTO> laptops = new ArrayList<>();
        final List<LaptopData> laptopDataList = laptopFacade.getAllLaptops();
        for (final LaptopData data : laptopDataList)
        {
            laptops.add(getDataMapper().map(data, LaptopWsDTO.class, fields));
        }
        return laptops;
    }
}- Mapping of Data to WSDTO in dto-mappings-v2-spring.xml.
<bean id="baseSiteFieldMapper" parent="fieldMapper">
	<property name="sourceClass" value="com.electronic.data.LaptopData"/>
	<property name="destClass" value="com.electronicwebservices.data.LaptopWsDTO"/>
</bean>- Defining scopes like BASIC, DEFAULT and FULL in dto-level-mappings-v2-spring.xml
<bean parent="fieldSetLevelMapping" id="laptopWsDTOFieldSetLevelMapping">
	<property name="dtoClass" value="com.electronicwebservices.data.LaptopWsDTO"/>
	<property name="levelMapping">
		<map>
			<entry key="BASIC" value="electronicId,electronicName,processorModel,ramGB,storageGB"/>
			<entry key="DEFAULT" value="electronicId,electronicName,processorModel"/>
			<entry key="FULL" value="electronicId,electronicName,processorModel,ramGB,storageGB"/>
		</map>
	</property>
</bean>- Create OAuth client
INSERT_UPDATE OAuthClientDetails;clientId[Unique=true];resourceIds;scope;authorizedGrantTypes;clientSecret;authorities
;trusted_client;hybris;besic;authorization_code,refresh_token,password,client_credentials;secret;ROLE_TRUSTED_CLIENT- Test the API through Swagger: One of the best ways to learn OCC is through Swagger. It is a visual interface built into Hybris that lists every available API.
Now that you have a grasp of the basics, the best way to learn is by doing – open up your Swagger UI, try out a few calls, and see. If you have any questions, feel free to reach out or leave a comment.